5/29/2012

How-Tuesday #33

Happy How-Tuesday everyone! I know it's been a while since I've done one of these, but I found some cute kid-friendly tutorials this week that went together so nicely! We have sidewalk chalk, a play kitchen, and rainbow cake!

These giant pieces of sidewalk chalk are super easy to make and will surely keep the kids busy for a good long time! Find the tutorial here.


This play kitchen is super-duper-awesome and it's made from an old entertainment center! I can't wait to have kids so we can have the best play kitchen ever! Check out the awesome step by step transformation here.


I love cakes in jars somethin' fierce right now, and this one is the brightest I've ever seen. My five year old unicorn and rainbow loving self would have freaked over this. Here's the recipe.

5/25/2012

My Newest Gig

So in this post I told you all about how I've been helping out over at World's Smallest Post Service as a part-time job. Well, Lea had some friends in San Francisco who were looking for my kind of help, and since she hasn't had a ton of extra work for me recently she sent me their way. Best. Idea. Ever.


That's Gabe and Cat, the masterminds behind one of the coolest companies I've ever worked for, Woodcut Maps. We make beautiful wooden map art for people. Gabe developed a great piece of software that lets you make custom maps on their website, then we have them laser cut and we assemble them. It's amazingly fun, and extremely gratifying. Seriously, if you go play with their website I guarantee you're going to want one. Here's one I made of Oakland that I want to buy:


And this is Katie, the map-making guru who taught me the process:


She's showing off how we make the maps at Maker Faire (more photos from that in the next post). Our booth won an editor's choice award which is pretty cool.

Anywho, I know I've been a little absent from crafting lately, but I've been working a ton out in the city. But never fear! I've got two craft fairs coming up in June, plus a fiber festival in July, so hopefully I'll be cranking stuff out very, very soon.

5/20/2012

Happy Hour.

Here in Oakland we have a monthly event downtown we all affectionately call First Friday. It's when all the galleries are open late to debut the new collections, and over the years it has become quite the place to be, especially for hipsters. We like to go for the people-watching as much as the art. Parking is a pain so we decided to ride down instead, and we were invited to my favorite local bar for happy hour beforehand by my dear friend Vanessa... Needless to say we never made it downtown. We spent the whole evening at the Heart & Dagger Saloon, munching on goodies form the nearby restaurants and having a super goofy time.


Dennis always makes me laugh so hard when he takes my photo. Actually, he always cracks me up. Anywho, this is one of my favorite outfits. I tried doing my hair up, but it just wasn't working so I let it be. The dress is old from Target, the belt was on sale at Urban Outfitters for three bucks, the scarf and sweater are from my mom, as well as the sweet tights that have a subtle herringbone pattern. And the shoes are the most comfortable heels ever made, from Chelsea Crew, but I don't think they make them anymore.


You know you've got a keeper when he knows to photograph your shoes without you prompting him to.


Everyone was having whiskey sours, until I ordered my usual bloody mary. They make delicious ones there and everyone is always so surprised to see me drinking them. I don't know if they think it's only supposed to be a breakfast drink or an old lady drink but I love them. Always ask for extra green olives.


The Heart and Dagger is one of those rare bars. It's walkable from our house, they have the friendliest bartenders, great music, they let you bring in outside food and your dog (or rather, Vanessa's cutie pie Carlton), and they have a wonderful patio out back.


The bar used to be called The Serenader, and they still have the old signage on the back patio and it lights up at night. Plus they have an amazing lemon tree and I assume they use the lemons in the drinks.


 Much of the discussions that night centered around giant jellyfish. Oh, and the Hello Kitty photo app. Good times.


Vanessa and Willie. Willie is quite possibly one of my favorite people to photograph; his face is so animated! There's a billion more photos on my flickr, here, if you'd like to have a look.

5/17/2012

New Art!


Dennis was joking with me the other day about the way I don't like to play video games much anymore because I feel like I could be doing something more productive, yet I'll sit on Pinterest forever getting "inspiration" and not doing much of anything with it. Well, he has a point I must say, so I've decided that I'm going to try to use the tutorials and such I find via my new favorite website as much as possible. The painting above that I made this past week for my bedroom may look familiar to some of you. I found the tutorial via Pinterest, and also discovered a fantastic blog that I'm not sure how I missed called A Beautiful Mess.


The basic idea is you find an old painting at a yard sale or thrift store to use as the base for your new text-based art. I found this lovely lady for two dollars at the East Bay Depot for Creative Reuse while hanging out with Dennis and my friend Carolyn. The Depot is just like a thrift store but they sell things for artists, so there's lots of random junk. Milk cartons, old dried up paint, a bin of about a thousand lemon-shaped stress balls for about ten cents each, just to name a few (and yes, I did buy a stress ball). There were plenty of paintings to choose from but I liked the muted colors of this lady. So, as per tutorial instructions I went to the craft store and bought a pack of  2" adhesive letters. They're helvetica, which seemed appropriate for such a hipstery art piece, and I had a 40% off coupon so they only cost me three bucks. I had a hard time finding them at first; they're in the paint section with the making tape.


I cut out the letters and laid out my message. Since I only bought one package I was short the last S and A and had to reuse the ones at the top, but I bought the repositionable adhesive letters so that wasn't a problem. The tutorial said that spray paint would probably be better than using liquid acrylic and a paint brush like she did because the paint tends to bleed under the edges of the letters. I didn't have any so I tried using a stippling brush (the flat-ended ones you use for stenciling) for the first few coats but I still got some bleed-under, which still looks fine. But really, if you want to do this get a can of spray paint and the whole thing will go a lot faster. 


For the last step after everything was dry I painted the edges of the canvas a bright metallic gold to help ground it on the white wall because I really like the way it looks without a frame.


 I'm so insanely happy with this! I think it would be fun if you take a photo of what the painting was beforehand and stick it on the back of the canvas. I can see the naked lady because I know she's there, but other people can really only tell it's a person because her face is very obvious, but they don't know it's a nude until I point out the naughty bits in some letters lol. 

5/14/2012

Play.

I've been reading quite a few articles and/or watching video documentaries on the importance of physical play for adults. Dennis made a quip about it, saying all he does in his free time is play. But I'm not talking about video or board games. I'm talking about going outside and running, jumping, being goofy, and using your imagination.


A couple posts ago I mentioned I was feeling a little blah because of my more sedentary lifestyle these days. That weekend Dennis suggested we go out of town and enjoy the beautiful weather, which was so sweet, and we ended up driving out to Bodega Bay and had such a wonderful time. The beach gets tons of driftwood washed ashore and people build it up into little forts and such, so we decided to finish one that was half-built in the sand dunes. We were playing foxtail but it was too windy, so I started rolling a giant awkward tree with a big stump still attached toward the unfinished fort. You can see how big it is in the photo, it's the stump on the right.


It took us forever to roll the log about 75 feet across the sand, working together with all our might to turn it over each time. It felt great! I wanted to build an entire roof for the back of it but the sun was starting to set and it was starting to cool off, so our picnic blanket was the best we could do...


I think this trip was the turning point that brought me out of my funk. Getting sunshine and fresh air was the best cure, but also just being goofy and acting like kids again really made me happy. Thanks for all your suggestions about getting more exercise, and I'm going to try to work on it. I'm going on my sugar cleanse again for a while, so I guess it's a good thing I went out with a bang with that strawberry short cake. Hope you are all having a wonderful start to your summer!

5/11/2012

Olive Oil Cake with Balsamic Strawberry Compote and Cardamom Whipped Cream


In celebration of it finally feeling like spring/summer around here, I offer up my new variation on a traditional strawberry shortcake. A lot of things this week have inspired me to make this. For one, I accidentally got lemon olive oil at Whole Foods instead of regular (it's got a ton of lemon oil in it). A happy accident as it's been infusing my cooking with a bright citrus note that I just love! Also, obviously the farmer's market is bursting at the seams with strawberries, and I've been seeing recipes using balsamic vinegar with them all over the place. Lastly, the new Oaktown Spice Shop near my house has been inspiring me to use more interesting herbs and spices. This is the best strawberry shortcake I've ever made, and I hope you'll try it too!


Cake ingredients:
4 large eggs
3/4 cup sugar
2/3 cup lemon olive oil
1 1/2 cups flour
1 tbsp baking powder
1/2 tsp salt

Filling & whipped cream ingredients:
1 lb ripe strawberries
4 tbsp light brown sugar
Juice of 1/2 a lemon (about 2 tbsp)
2 tbsp balsamic vinegar
1 cup heavy whipping cream
1/4 cup sugar
1 tsp vanilla extract
5 cardamom pods (about 1/2 a tsp ground cardamom)

Preheat oven to 325 degrees. 


In a small bowl, beat the eggs until frothy, then add the sugar and beat until it starts to lighten in color.
Transfer the liquid to a larger bowl and add the olive oil. 
Whisk until emulsified and frothy. 
Add the baking powder and salt and whisk until well combined. 
Then switch to a rubber spatula and add the flour, stirring it in until completely incorporated.
Pour the batter into a greased bunt pan and place on a rack in the center of the oven.
Bake for 30-35 minutes, until golden brown around the edges and when a toothpick inserted into the center comes out clean.


While the cake is baking, gather your filling ingredients.
Clean, hull, and slice the strawberries.
Juice the lemon and add to the strawberries, making sure to strain it for seeds and pulp.
Add the balsamic vinegar and brown sugar, and stir the berries to make sure the sugar is dissolved and the berries are coated in the juices.
Cover with plastic wrap and let it sit in the fridge while the cake cools.


Make the whipped cream once the cake has cooled, right before serving.
Use an electric mixer with the whisk attachment, and begin whisking the cream on medium speed.
Once it starts to thicken, add the sugar, vanilla, and ground cardamom.
Be very careful not to over-whisk or you'll end up with butter. The whole process only took me about 2 minutes of whisking.


Lay a small slice of bunt cake on the plate, and top it with a layer of strawberries, and be sure to drizzle on the syrup from the bottom of the berry bowl.
Top with another slice of cake, more berries and syrup, and dollops of whipped cream.
Enjoy.

5/10/2012

Making Friends (Friends Who Make Things) Round 2!

Hi all! I wanted to show off a friend of mine, Julie of Vintage Inspiration! Her work is so fun and I own quite a few pieces, including some button rings and a Mr. Spock magnet. She fashions jewelry and magnets from bottle caps and vintage pieces, and she has every theme under the sun!


I met her at my first A Fair to Remember (which, by the way, I will be selling at this coming Sunday!)


So amazingly yummy! Please go check out her etsy shop, which is full of vintage and handmade goodies, or stop by and say hello at A Fair to Remember. She said she's signed up to sell at every one through October!

5/07/2012

Pin Curls.

I have to admit, lately I've been feeling a little down. Just kind of a general blah, which is unusual for me, especially in summer. I've just been sitting around too much I think, getting chubbier, so I really need to exercise more. It's amazing how much more exercise I got working a regular 9-5 retail job; I was on my feet all day. Since I made the transition to working for myself and freelancing at other creative companies I sit around all day making things now...


So to get myself out of the dumps and feel special, I decided to go all out and do my hair and makeup big-time, all on my own. For those of you who know me this is no small feat. I went to the 15th anniversary show of Thrillville at our local tiki lounge, and I decided that would be the day. I did my hair up in pin curls while it was still damp, then gently blow-dried it to set them. I've never done them before, but I was sure I could do them since they're so simple, inspired by this video from Tiger in a Jar, which is for ragdoll curls but it's really the same thing. Moment of truth as I took the first one out... They looked good! Yay!


I ran my fingers through them to break them up a bit, put in some hairspray, and pinned a twist behind my ear with a little bobby pin with a bow on it. I could have stopped there, but I was determined to go all-out bombshell. I stink at doing makeup, but I did it very slowly, carefully, and deliberately...


 It took me so very long to do my makeup, but I really like the way it came out. I always see girls walking around with red lipstick and I find myself wishing I could pull it off. What the heck? If I can pull off hot pink skinny jeans I can pull off red lips darnit. My mom taught me to get a waxy red lip liner pencil and cover my entire lip with it as a base, so that's what I did. It turned out nice. Then I used a black pencil for my eyes, which I'm not used to. I usually use a chisel brush with some water and black-green eye shadow if I want any kind of liner. But I went for it and did some nice big swoops, and lined the inside of the bottom too. Pretty good!


Topped off the hair and makeup with a very Mad Men inspired dress, big belt, and a necklace I made. Little black patent leather kitten heels are on my feet, but I decided to forego the fishnets for comfort. I feel pretty kick-ass in this getup, I must say. I'm wondering though if anyone out there has some good tips for adding more activity to a craft-based lifestyle? Or am I doomed?

5/02/2012

How to Quilt


This is a post about your first quilt. Yes, you. I've had so many of my friends look at me as I'm binding a quilt and lament, "I wish I knew how to quilt." I used to say the very same thing. And while I don't claim to be any kind of expert as I've only completed  a couple of baby quilts thus far, I know that anyone who can sew a straight line can also make a quilt.


My mom recently came to visit me and we were going through some of my fabrics when she fell in love with a fat quarter of a sweet Japanese cotton/linen blend printed in neat little squares to look like patchwork. She asked me to quilt it up so she could use it as a table mat. As I was about to begin I grabbed the camera and documented it all. Four hours later I had a beautiful little quilt, and a tutorial.


I hope all of my readers out there who have always been too intimidated to try quilting will give this a try. Half a day and a few simple materials is all it takes, and you can take what you learned and move on to the next level.

Quilted Table Mat

Materials:
1 fat quarter of a patchwork-like print
1 fat quarter of needle-punch weight cotton batting (if you don't want to buy batting you can use two layers of inexpensive craft felt instead)
1 fat quarter plus 1/4 yard of a coordinating solid fabric (or if you only have a fat quarter you can get some wide double-fold bias tape instead of making it yourself)
Coordinating thread

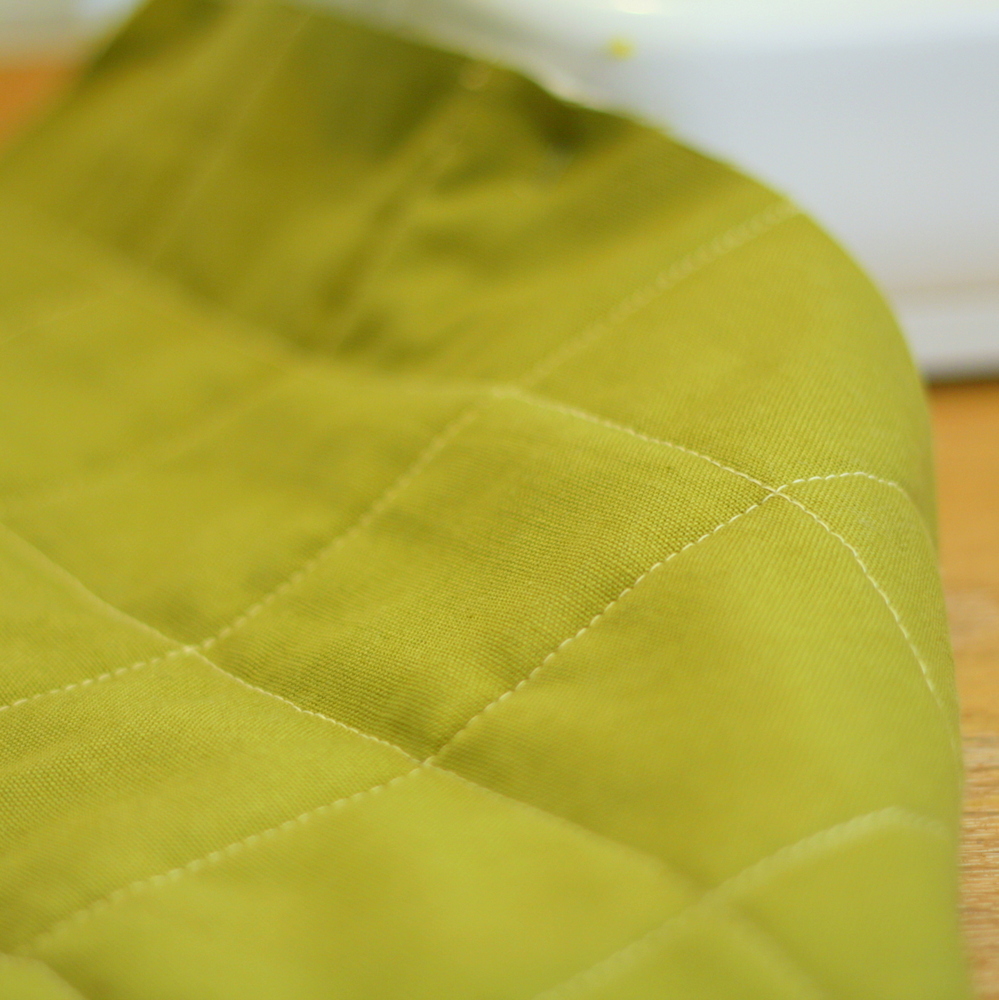
1. Take your solid cotton quarter and lay it out, then put down your batting, then the top. Pin all the layers together (you don't have to use a lot of pins).


2. If you have a walking foot for your machine, now's the time to use it. I don't have one - instead I just make sure to hold the top fabric taught as I sew to avoid puckering. Also be sure to take out any pins that are close to where you're sewing as you go. You don't have to back stitch at the beginning or end of a row since they'll be encased in the binding later. Do every row of stitching from top to bottom first, starting from the middle line and working your way out to the edges, then turn the work and repeat.


3. That's all there is to the actual quilting part of this. I told you it was easy! For your next quilt, sew some squares of fabric together and do the same thing. 

Now comes the more technical part of binding the quilt. If you bought double-fold bias tape then you can skip this section and go straight to the blind-stitch, but I encourage you to make your own binding. It's fun, more economical, and you can get a perfect match. 

Take your extra quarter yard of fabric and cut it lengthwise into 3-inch wide strips. 
Now, bias tape is called such because it is cut from fabric "on the bias", i.e. at a 45 degree angle to the grain. You'll want to do this when you are using most patterned fabrics, especially stripes or anything printed in rows, so the pattern is all over the binding. I tend to make my bindings out of solids or non-linear designs just so I don't have to bother cutting on the bias. 
Anywho, once you have your strips, you're going to want to join them at an angle so your binding won't be lumpy. Take two strips and line their ends up, right sides facing, at a right angle. It'll look like this:


4. When you've got the pieces to this state take a moment to make sure you're going to be sewing it correctly. You want to sew from corner to corner to create a diagonal seam between the two pieces when you open them. If you sew in the wrong direction you'll definitely be able to tell when you try to unfold it. Pin the pieces together and then unfold it briefly just to make sure you end up with a nice continuous strip.


5. Sew diagonally from corner to corner:


6. (Yes, yes, I know: never sew over pins. I'm a rebel like that.) Trim the corner off, after making sure you sewed it correctly of course.


7. Press the seam open on the back, then turn the binding over and press it again.


8. Et voila! Connect the rest of your strips the same way until you have one long piece.


9. Now start pinning the binding to the edge of your quilt. Just line the edges up and pin along. When you get to the corner, put the last pin about an inch away from the edge:


10. Take the binding to the edge, then hold the corner and turn it at a right angle, and put a pin about an inch away:


11. After you've finished pinning the entire binding around, you need to deal with the place where they meet. Take the lower layer (the one that will have its edge showing when you turn the binding over), and fold its edge back at an angle and press it with an iron. We're trying to mimic the angled seams of the rest of the binding.


12. Lay the other layer of binding over the top and trim it. Keep it long enough to cover the layer below it, and pin both layers in place. Now you can start stitching the binding on.


13. You want to sew the binding on with just under 3/4 of an inch of seam allowance. This, on most sewing machines, in the line marked 16. 
(We're basically making double-fold bias tape, but since I have a bit of an aversion to ironing, and ironing a long thin strip is kind of a pain for anyone, this is an easy way to do it. Your seam allowance will depend on how wide you cut your strips, and will be about the same as how wide it ends up being on the front and back. Since my strips were 3 inches wide, divided by four [the two allowances and the front and back] it's 3/4 of an inch. That's the seam allowance and the width of the binding. I say sew it just under the correct seam allowance to account for the width of the quilt itself, which is about an eighth of an inch. If you like the binding thinner, say, half an inch, you'd cut a 2-inch strip and sew it with a 1/2 inch allowance. If you want it wider, cut the strip wider and sew it with a wider allowance. I hope that makes sense.)
 

14. Anywho, start sewing the binding on near the overlapping ends, and when you reach the first corner, take out the pin facing you...


 ... and get the corner fold out of the way of the presser foot:


 15. Sew until you come to the last pin you placed about an inch from the corner, back-stitch and take the piece out of the machine.


16. Now fold the corner flap back, over where you sewed, and be sure to get the bottom layer of binding out of the way of where you'll be sewing on this edge: 


17. Start sewing about an inch away from the corner:


 18. Sew all the way around and do all the corners the same way. When you're done, the back of the corners should look like this:


And when you turn the corners inside-out, the magic happens...


Boop! A mitered corner!


19. Turn out all the corners and fold the binding out. Press the sides with an iron, but avoid pressing the corners.


20. Now you just have to fold the binding over and hand-sew the back. Start at the point where the binding begins and ends:


And place a pin in the seam to keep everything together:


21. Flip the quilt over. You're going to fold the raw edge of the binding inside and line the fold up so it slightly overlaps the stitching around the border and pin it in place:


22. Fold over the outer layer of the seam as well, wrapping it around the inner layer, and pin it in place.


23. Start folding the binding in on itself and pinning it in place, making sure to just barely cover the row of stitching:


24. Thread your needle (you should use a matching thread for this, but for visibility in the tutorial I'll use the quilting thread), tie a knot in the end, and sew up through the back of the binding, being sure to go through all the layers:


25. Stitch over the seam to secure it, then stitch down the seam of the binding to the back fabric, only picking up a few threads of it in the stitch, and make sure you only go through the layer of solid fabric, not through the front fabric as well:


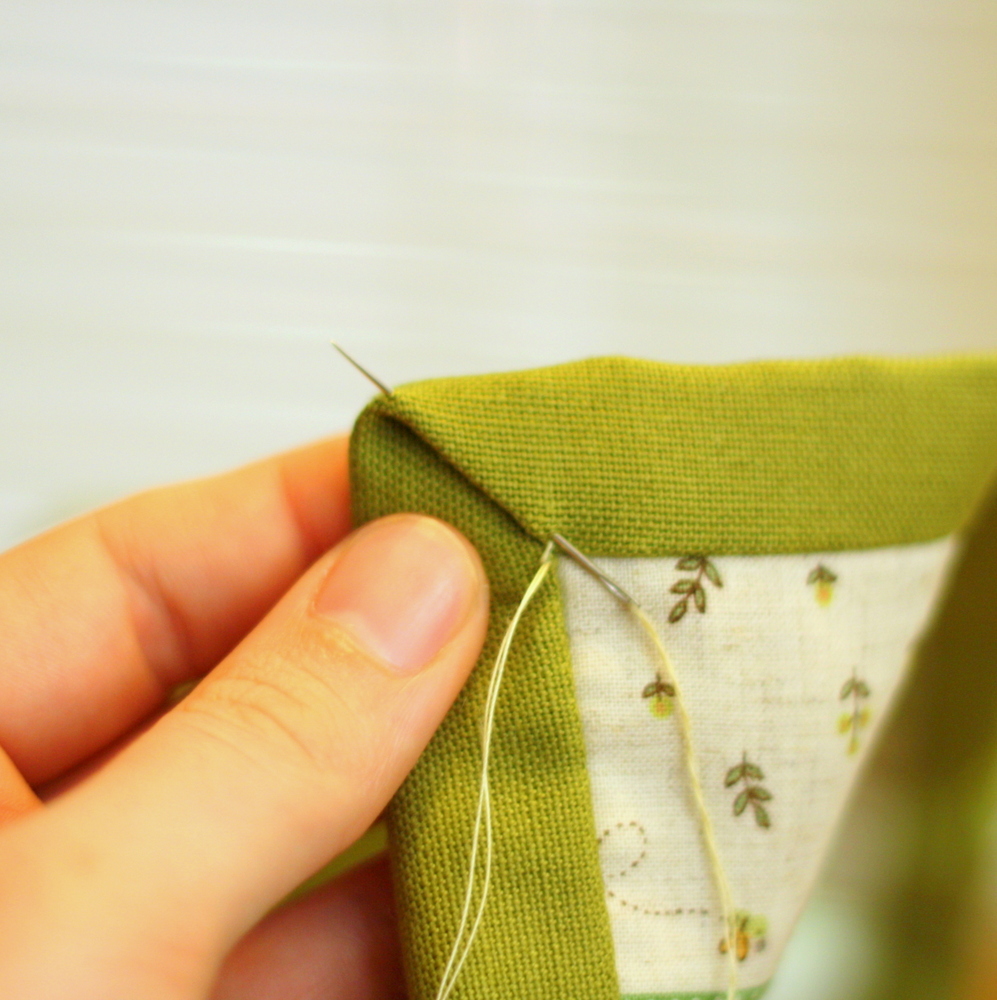
26. There are quite a few different techniques out there to sew on a quilt binding. I prefer using an encased blind stitch. It just seems to be the neatest and strongest stitch, but I'll show you two ways to do it, and you can figure out which you like best. The first way is to insert your needle back into the edge of the binding, straight across from where your thread is coming out of the backing, and let the needle travel down a scant 1/4 inch or so inside the fold of the binding, coming back out along the fold:


Then you pick up just 2-3 threads of the back fabric, just across from where your needle came out of the fold:


 And then insert you needle back into the fold very close to the place you exited, and travel down inside the fold as before:


You keep repeating this stitch pattern and removing the pins holding down the binding as you go, and you will get some nice, strong, invisible stitches to keep your binding down:


27. The other method of blind stitching is very much the same, except instead of traveling inside the fold of the binding, you travel inside the back fabric. You just need to make sure not to go through the front side, as always, and when you come out down the line you pick up a couple stitches of the binding's fold, and travel back inside the back fabric:


28. I prefer the second method as it feels like a much smoother motion, and there's really no difference in the look of the stitches. In this photo, my thumb is where I switched methods, and you really can't tell either way:


29. Anywho, once you've mastered the blind stitch (and if you're still having trouble there are some really good video tutorials on YouTube as always), and you've sewn up to a corner, fold the binding in on itself as you have been doing, all the way to the edge, which will look like this:


30. Now fold the top part down, and tuck the binding on the next edge under as you have been, and you should get another nice mitered corner:


31. Pin the corner in place, and stitch right up to it, with your last stitch coming out right near the seam:


 32. Now stitch over the seam, poking your needle all the way through to the other side of the quilt, making sure it comes out close to the same seam on the opposite side:


 33. Stitch over this front seam and back through the quilt, making sure the needle comes out near where you started stitching:


34. Repeat these steps 2-3 times, until you feel like the bottom of the corner is secure. On your last round, instead of putting your needle back through to the back of the quilt, travel it through the fold of the corner to the top, coming out close to the seam (be sure you're inside the fold, not just under it):


35. Stitch across the seam, sticking your needle through to the back just like you did at the bottom of the corner:


36. Stitch through a few times, and when you're satisfied that the top of the corner is secure, on your last stitch instead of going back to the front, travel inside the fold again, coming out on the left of the seam so you can continue your usual blind stitching on the binding.


You know all you need to finish the quilt now! Just keep blind stitching around the border and securing the corners when you come to them. When you reach the end, tie a small knot close to your last stitch, and pull the knot under the binding seam to hide it.