3/30/2012

My new potholders.


My mom gave me a bag of antique quilt pieces a very long time ago. They were so lovely, but obviously cut from a quilt that was in very, very poor condition. These flowery applique pieces are so pretty, and since there were 4 of them I decided to sew them face-to-face and add a little loop of twill tape to make myself some new potholders! Whoever cut the quilt apart cut pretty close to the edges so some of the edges are a little obscured, but hey, they're potholders. And since some of the fabrics are very tattered at least my heart won't be broken when Dennis accidentally lights them on fire (okay he's never actually lit anything on fire, but he worries me in the kitchen so I know it will happen some day).


It makes me feel good to know that someone worked really hard on this quilt (it's all made from 1930's flour sack fabrics too), and then someone loved it so much that it was used to death, and even at the end of its usable life it can still be used and loved by someone else in a new incarnation. Yay reuse! There was also another bunch of quilt pieces in the bag cut from a different quilt that was all hand-quilted. I saved what I could and made something special which will be in the shop soon, so stay tuned!

3/27/2012

Oatmeal Macaroons


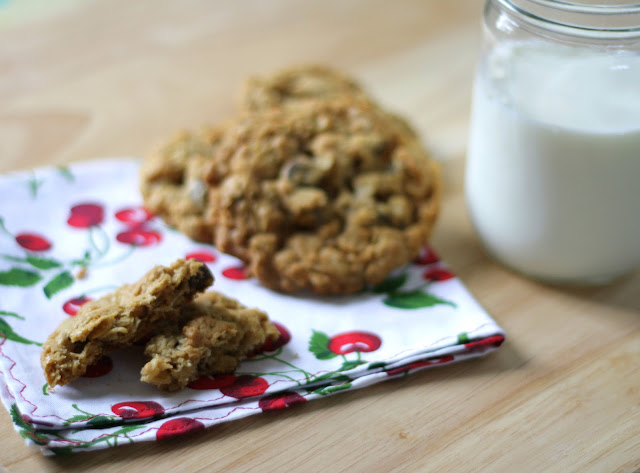
These are, quite possibly, the best oatmeal cookies ever. I've been making them since college and they're the greatest because, for one, the recipe makes like 3 dozen cookies. Two, they're the perfect texture - crispy on the edges and chewy through the middle. And three, they're friggin' delicious! Make them, trust me.


Oatmeal Macaroons
Preheat Oven to 350 Degrees

1 1/4 cup vegetable shortening
2/3 cup brown sugar
2/3 cup granulated sugar
2 eggs
1 1/4 cups flour
1 1/2 tsp vanilla extract
1 tsp baking soda
1/2 tsp salt
1 tsp cinnamon
3 cups old fashioned rolled oats
1/2 cup chocolate chips (you can switch this out for any combination of chopped nuts, dried fruits, or other kinds of chips, and feel free to combine mix-ins up to 1 cup's worth)

*For a vegan version, be sure to use vegan chocolate chips, and replace the eggs with 1/4 cup shortening and 1/4 cup applesauce.

1. With a rubber spatula, beat together the shortening and sugars until well combined and fluffy.
2. Add the eggs one at a time and the vanilla extract.
3. Beat in all the dry ingredients except the oats and chocolate chips.
4. When you add the oats and chips or other mix-ins, it's quite a work out to stir the batter, but keep combining until everything is thoroughly mixed.
5. Scoop with a cookie scoop or use a big spoon and roll the dough into balls and place on a parchment-lined cookie sheet.
6. Bake for 12 minutes, one sheet at a time, in the upper half of the oven. They should be a deep golden brown on the edges and slightly puffy in the middle. 
7. Let them cool for a while on the sheet before transferring to a cooling rack or else they will fall apart! Enjoy them with an nice big glass of cold milk. ^_^

3/24/2012

Art Beat Rocked!


Oh man, seriously people, Art Beat Bazaar was so much fun! The musicians, Christina Baily and Kelly McFarling, were so good, and Karen Finlay, the spoken word artist, was so cute! All the other vendors were so wonderful, I wish I had taken more pictures! But I hope to be at the event again next month (It happens every 3rd Sunday), which will give me another chance to capture more. My friend Emily gave me a ride and ended up staying with me all day and helping me sell! What a gal, she's my hero! A bunch of my friends came out to say hello, and sweet Carolyn gave me a ride home. I have the most awesome friends. Ever. Anywho, here are some photos, and some fun news: I've got tutorials in the works for both the bunting banner and the enamel key and locket necklaces coming up soon!


I was able to spend some time on my table for once, and even got to set it up and test it out at home. I made the table cover out of the fabric I had left from making this skirt. Luckily it was juuussst enough. The event was held in a pub, and even though the lights were left on inside it was still a bit dark so we all brought table laps! Here's Emily, my wonderful helper:


Fascinators! I've had these made for a little while, but I feel like I really need to photograph them on real people before I can put them up on etsy. I sold a few at the event and it felt great!


Fun new necklaces will be in the shop soon, with a nice tutorial on here as well.

3/22/2012

For your reading convenience...

I've noticed lately that a lot of blogs are utilizing Bloglovin, so for those of you who use it regularly I thought I'd better jump on the band wagon. There's a link on the sidebar, click on it to add me to your Bloglovin account!

Follow my blog with Bloglovin

3/21/2012

Crazy Quilt.


I remember my mom talking about making "crazy quilts" when I was a kid, but until recently I never really got the concept. Last week, late at night, I wanted to do something random, creative, and quick. So I grabbed this pile of coordinating fabrics that my friend Ivy gave me. They're all some kind of super-soft microfiber chenille, and the color palette is too fun! (Sorry for the late-night odd-colored photos.)


I decided to just start randomly sewing pieces together, then cutting the big pieces apart at random intervals in different directions, and then sewing the smaller pieces together randomly until the two pieces I had to begin with were all used up, then I moved on to the next two.


I ended up with five piles of patchy pieces, then I started grabbing pieces from the piles and trying to find ones that were the same size, but oriented with the seams perpendicular, from the other piles. More random sewing and trimming as needed occurred.


In the end I came out with what you see at the top, after piecing bigger and bigger blocks together based solely on what fit where. It was like a giant jigsaw puzzle and I had so much fun doing it! I think I broke just about every rule of quilting and it felt good. No measuring, no straight edge, no rotary cutter, no pattern, no ironing. Just me and the fabric and the scissors. I think I'll sash it in white and quilt it in some random pattern, which I've also never done before. More on this one later...

3/19/2012

Super Sweet Custom Order...


I love doing custom orders. Brainstorming with customers, getting to make special items and go a little over the top compared to what I normally do... It feels great. On the "Hire Me" page I have a little blurb about custom orders, and recently I got a few for the Moustache Soaps I listed in the shop. My favorite one was six special soaps as favors for this little guy's birthday party:


That's Ash, and his mummy told me he's obsessed with orange (the fruit as well as the color), and moustaches! The sweet invitations were done for her at Brown Paper Goods on etsy. With that as inspiration it was easy: I scented the soaps with tangerine and vanilla essential oils and packaged them in little kraft boxes with orange and white baker's twine:


So yay! Another nice little item to add to my portfolio of custom work! If you'd like me to make something for you, send me an e-mail at ohthecuteness@hotmail.com!

3/16/2012

Seed Starter Tutorial

It's officially gardening season! I kept seeing little seed starter pots all over Pinterest, and I decided to go with ones made from recycled newspaper and a soup can for a form. They're made pretty much the way you fold up the end of a roll of pennies. I've seen others that are origami boxes, which I can make with my eyes closed as I use them to package earrings I sell, but the soupcan/pennyroll method seemed faster. Though you're supposed to secure the side and bottom with tape, which would mean they're not fully compostable, unless you use washi tape!


Oh yeah... I went there. And obviously from the photo, I used a soda can instead of the soup can. Here's how to make them:


Assemble your supplies: a free newspaper, a soda or soup can, and some washi tape.


Take a sheet of paper and fold it in half (or as small as needed so it's an inch or so taller than the can). If you're going to be planting these the second the seeds sprout, you could cut the paper in half instead of folding it. The pots will be thinner but it makes the paper go farther.


Starting a little down from the top of the can (so you'll have something to grab when you want to pull the can from the pot), roll the paper around the can.


Secure it with a piece of washi tape.


Flip the can over.


Fold down the front of the paper so it's flush with the bottom of the can.


Repeat with one side...


Then the other.


And secure with a piece of washi tape!
Just fill with soil and plant your seeds, water accordingly, and pop the entire thing in the ground when you're ready to plant!


I made an entire fleet of these little guys and stuck them in an antique soda crate. See what I did there? Yes, I thought I was being clever. We have a little overhang outside our kitchen window, so I leave them there in the daytime to get sun and then bring them in at night, and set them over the sink to water them. I'll post pictures when they're all sprouted!

3/14/2012

Lake Date!


Dennis and I had a little date at the lake, going to the new Oaktown Spice Shop (love love love), and grabbing some Ethiopian food for lunch. I brought the camera along and let (okay, begged) Dennis to play around with my fancy new lens and snap some pics of my fancy pants outfit. (My friend Vanessa says if I get more colored jeans my new nickname will be fancypants. Swoon!) I must say he took some good ones!


Pants from the Gap, shoes from Urban, purse was second-hand from a Crossroads in Berkeley. Shirt and tank from Target, Necklaces and rings are all handmade from various local places, watch from Anthropologie, and bracelets were a gift from my mom. The knitting needles in my hair are vintage acrylic.  ^_~

Oh! By the way, I figured out how to put my hair up with those knitting needles from a pic I found on Pinterest. I'm so terrible with hair, so if I can do it, anyone can. Here's the link: http://pinterest.com/pin/147000375307048558/

3/12/2012

Art Beat Bazaar!


Hi all! I'm pleased to announce that I will be selling my crafty goodness at a new monthly venue, the Art Beat Bazaar! The Art Beat Foundation is an organization that helps foster local artists, especially musicians. They hold an event every 3rd Sunday at the Starry Plough Pub in Berkeley that consists of local musicians, spoken word performances, and crafty vendors. I hope some of you will come by and support local artists, and as always if you mention that you're a blog reader you get a discount on my goods! Click here or on the picture above for the list of musicians, authors, and vendors that will be there!

3/07/2012

Pound Cake Perfection. And yes, there's a recipe.


Okay, I know I've been trying to eat healthier lately and help Dennis with his diet, but I had a friend over for tea recently and I just had to bake something. It would have been rude not to, right? And afterwards I took the remaining 1/2 of this bad boy to work to share and they loved it. This, my friends, is my old stand-by: Whiskey-Almond Pound Cake. Oh yes.
It's an adaptation from a recipe found in The New Good Cake Book, which was first published in 1982 and I have a newer edition. If you need a good, solid, no-frills book of basic classics like red velvet and honey cake, this is the one to get. Sometimes this cake is made with bourbon and ground walnuts, and I've even made it with orange liqueur as well, but we've had a bottle of Jack Daniel's sitting on our counter since the housewarming party. (I told Dennis no one would drink it, to which he replied, "Then I will at least."... One year later, it's still there.) I'm not a fan of Jack for any kind of drink, but in a baked good, yum! And we had almond meal already so it was meant to be. It's a true pound cake, super dense and heavy, buttery and egg-y and awesome. But the best thing about this recipe is the flavor - the whiskey mostly cooks off, leaving behind just a sweet nutty hint, except for in the center of the loaf, and when you get to it it's so delicious and rich. And the almond meal compliments it so nicely in both flavor and texture. Plus this cake is perfectly sweet, almost more bread-like in its subtlety. Now, this recipe makes a ridiculously large amount of batter, and along with this monster loaf I made a smaller one. The original recipe doesn't mention splitting the batter in two, but I'd recommend it, just watch the baking time.

Whiskey-Almond Pound Cake
Preheat oven to 300 degrees.

2 sticks softened butter
1 2/3 cups sugar
5 eggs
1 cup Jack Daniel's (or any whiskey you have on hand)
3 cups flour
2 teaspoons baking powder
1/2 teaspoon nutmeg
1/4 teaspoon salt
1 cup almond meal

1. Grease and flour two standard loaf pans.
2. In a very large bowl, cream together the butter and sugar, then add the eggs, and then incorporate the whiskey.
3. In another bowl stir together all the dry ingredients, then add them to the liquids slowly and make sure they are well-incorporated.
4. Divide the batter between the two pans equally and bake both at he same time. Bake for about 1 3/4 hours or until a toothpick inserted in the center comes out clean, and let cool in the pan.

And be lush. ^_^

3/05/2012

Tres Chic?

I try to be "fashionable" as much as I can, but most days I only have the energy to throw on jeans and a tee, haphazardly blow-dry my hair, and maybe put some jewelry on. But that darned Pinterest site is so full of lovely fashion inspiration, and it's making me want to put together "outfits" and try doing my hair and makeup here and there. I suppose it doesn't take that much extra time... So, is this any good? Or do I look like a dork?


Well, I like it, and I that's all that really matters, right? Shirt is very old, from Target, belt is from Urban Outfitters, my sister made me the skirt, the tights were from a swap party, and the shoes are Urban, as well as the glasses. Mom got me the yellow leather wallet and the pearl bracelet, and Dennis gave me the necklace and antique silver bangle. I managed to pull my hair out of my face and my bangs are getting so long that I have to pull them to the side now! I feel pretty! ^_^

3/01/2012

Mini Mushroom Amigurumi Pattern!


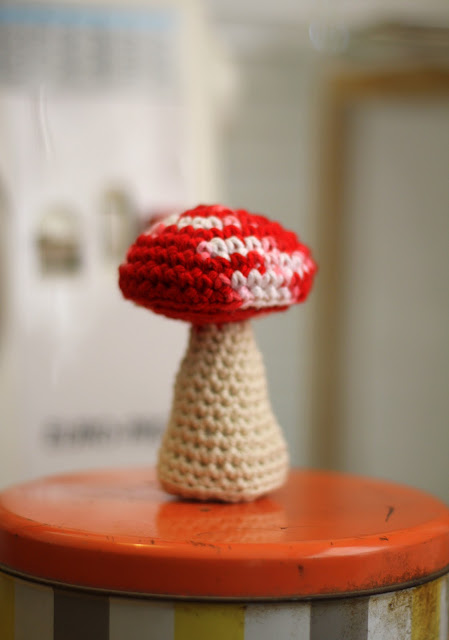
I made this little guy as a belated birthday gift for a friend, and I thought I should post the pattern! It's a great beginning amigurumi pattern because if it comes out a little wonky it's fine, because it's a mushroom, and they're all a little wonky in real life, right? I think it would be super cute with white pins in the top too so it can me useful. I was also playing with the idea of doing a "How I Make Amigurumi" photo or video tutorial using this pattern, might be fun... Anywho, if anyone catches any errors in the pattern please let me know!

Mini Mushroom Amigurumi Pattern
This pattern is worked in a continuous spiral, so be sure when you need to skip stitches for decreasing that you skip the very last stitch, which will simultaneously put down the first stitch of the next round, so you'll get the correct number of stitches. It measures about 3 1/2 inches tall when done. There's no guage, just crochet as tightly as possible.

Size US G7 (4.5mm) Hook, smaller is fine.
Peaches & Creme or Sugar & Creme 100% cotton worsted weight yarn in cream and 191 Peppermint
Small amount of batting
5 glass pebbles or rocks
Abbreviations: sc = single crochet, rnd = round, sts = stitches, slst = slip stitch

Start with Peppermint colored yarn.
Rnd 1: Create a magic loop and crochet 6 sc into loop, pull it tight and join with a slst. (6 sts)
Rnd 2: 2 sc into each sc around. (12 sts)
Rnd 3: *1 sc in next sc, 2 sc in next*, repeat around. (18 sts)
Rnd 4: *1 sc in next 2 sc, 2 sc in next*, repeat around. (24 sts)
Rnd 5: *1 sc in next 3 sc, 2 sc in next*, repeat around. (30 sts)
Rnd 6: *1 sc in next 4 sc, 2 sc in next*, repeat around. (36 sts)
Rnds 7-8: 1 sc in each sc around.
Rnds 9-12: Crochet into back loop only!
Rnd 9: *sc in next 5 sc, skip 1 sc*, repeat around. (25 sts)
Rnd 10: *sc in next 4 sc, skip 1 sc*, repeat around. (20 sts)
Rnd 11: *sc in next 3 sc, skip 1 sc*, repeat around. (15 sts)
Stuff cap with batting.
Rnd 12: *sc in next 2 sc, skip 1 sc*, repeat around. (10 sts)
Switch to the cream colored yarn.
Rnd 13: In the front loop only for this round: 1 sc in each sc around.
Rnd 14: 1 sc in each sc around.
Rnd 15: *sc in next 4 sc, 2 sc in next*, repeat once. (12 sts)
Rnd 16: *sc in next 3 sc, 2 sc in next*, repeat around. (15 sts)
Rnds 17 -19: 1 sc in each sc around.
Rnd 20: *sc in next 4 sc, 2 sc in next*, repeat around. (18 sts)
Rnd 21: 1 sc in each sc around.
Rnd 22: *1 sc in next 2 sc, 2 sc in next*, repeat around. (24 sts)
Rnds 23-25: 1 sc in each sc around.
Rnd 26: In the back loop only for this round, *1 sc in next 5 sc, skip next sc*, repeat around (19 sts)
Stuff the stem with batting, leaving a little room for the weights.
Rnd 27: *1 sc in next 4 sc, skip 1 sc*, repeat around. (16 sts)
Add weights, and try to distribute them evenly so the bottom lays flat.
Rnd 28: *1 sc in next sc, skip 1 sc*, repeat around (8 sts)
Rnd 29: *1 sc in next sc, skip next sc*, repeat twice, close opening and weave in end.


If you have found this or any of my other free patterns useful and would like to help me keep creating them I accept PayPal donations!